This tutorial will guide you through the latest feature of Now3D, introduced in version 1.23.50, called Cartoon shading which is also known as Cel shading and is a novel way of rendering 3D graphics. It's all about rendering cartoon looking graphics out of 3D models, here is one example of an XBox games using this technology: Cel damage.
The tutorial will show you how to toon shade an imported object, a ready-made scene can be found here. This is the original example scene made by Giuliano Cornacchiola. While the tutorial example model and renders aren't that flashy or advanced, it does show you how to get things done, I've used much more advanced geometry and it worked the exact same way (just a little slower rendering). Download the tutorial file linked below, you'll get the object you are going to import and the readymade scene.
| Tutorial File : Toonshade_files.zip (40Kb) |
|
| |
|
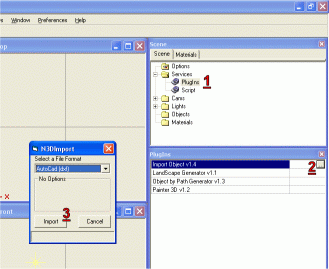
| Import the object we are going to toon shade. It's a DXF I found somewhere on the web, just follow the numbers and you will see... |
 |
| |
|
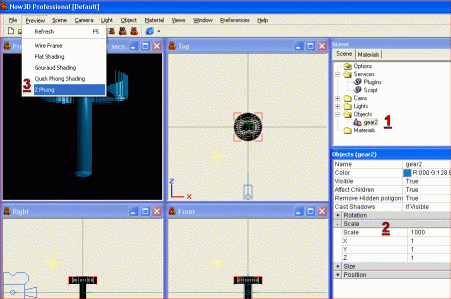
| Absolutly nothing, typical of import/export between different applications is the scale always being wrong. Bump up the default from 10 to 1000 (2).
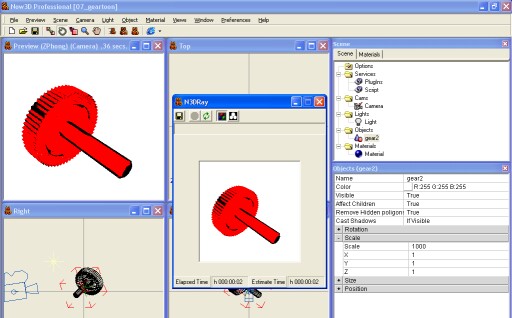
Then change the preview to ZPhong (3) to see what we got...
|
 |
| |
|
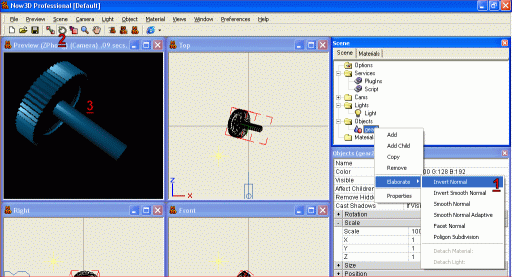
| Doesn't look like it should, yet another issue with importing files is the "flipped normals" problems that shows up very often. Right-click the object and choose Invert Normal (1).
Press the Rotate button (2) and spin around the object (3), depending on how fast the computer is, the refresh rate might be a bit slow, but you can see that it looks like it should now.
|
 |
| |
|
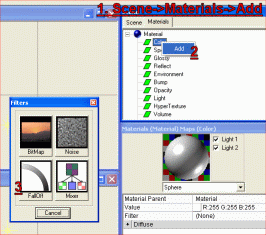
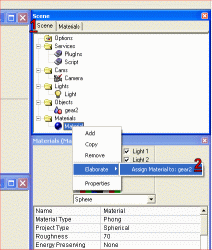
| Now it's time to add a material, in the scene tab (hidden behind the Materials tab in the picture) you just right-click the Materials folder at the bottom of the scene graph and choose Add (1). Then jump over to the Materials tab (it's the same function in two different places, a little confusing for newbies maybe), rightclick Color and choose Add (2). Then choose FallOff (3). |
 |
| |
|
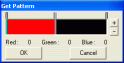
| This is the secret behing toon shading, making a material with only a limited number of colors, in this case, 2 colors only, no fading whatsoever. With the FallOff chosen, click the Color bar in the Materials window and press the box with the ... dots (1) to get the Get Pattern window. Press the plus (2) twice to add more color lines, the lines can be moved to the left/right. Double click the color line (3) and choose red color for the first two and black for the third (4), then move the middle color lines together. |
 |
| |
|
| You should have something looking like this, a clear border between red and black with no fading in between. |
 |
| |
|
| Now that we have a new material, it's time to glue it on the object. In the Scene graph (1), choose the material and assign it to the object (2). |
 |
| |
|
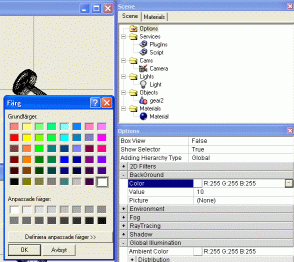
| Toon shading looks better with a bright background, so we need to change the background from black to white. In the Scene graph, Choose Options, Background then click the ... box in the color row and choose the white color in the color dialog (called Färg in the screenshot since I'm running a Swedish Windows XP.) |
 |
| |
|
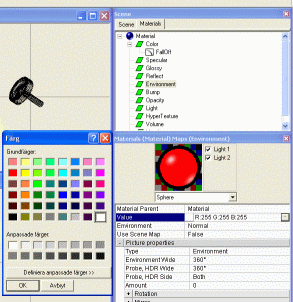
| To get something else than a full black image, we must change the Environment color from black to white. Look in the materials tab for this. |
 |
| |
|
| The last thing to do to avoid the full black render issue is changing the Global Illumination from black to white, look in Scene graph, Options, Global Illumination, Ambient color and change colors. |
 |
| |
|
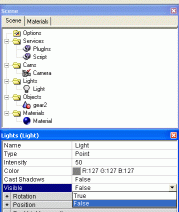
| Oh yeah, forgot one thing, turn off the lights, otherwise we'll get the usual shaded look with color fades. Choose the light and change the Visible from True to False. |
 |
| |
|
| There we have it, the end result, with more advanced geometry it looks a lot better.
You can also add several colors to the fall-off color tab so that you have a couple of shades, for example a pink shade would work well here.
You can also swap the red for white color to get a look of a hand drawn sketch.
Tip: If you have a very complex geometry, you can always render the Preview window, ZPhong maximized and get a result very close to the rendered image. Then resample the screenshot (Press "Prt Sc", the Paste in your image editing software) to 800*600 and you have 4xFSAA (AntiAliasing) about 100 times faster than with raytracing. Keyword is RESAMPLE, not resize, resampling uses better techniques similar to AA, while resize just throws out pixels and you are stuck with the same end-result. Irfanview is a good freeware image-editor with good resampling capabilites.
|
 |
| |
|
| Stuff I haven't figured out yet is better control over the shadows, so far I can move the color borders in the fall-off color dialog to get more of less black, but that isn't the same as shadow control. If you have any tips or comments, you are more than welcome to post in the Forum right here. |
Copyright 2003 Toni Stojanovski
|